How to Add Beneficiary Account in Yono Sbi
State Bank of India (SBI) has aligned itself with the technological advances to give its customers the ease of transacting with the bank from any corner of the world. In addition to the net banking facility, the bank offers mobile banking services as well where you can get numerous services through the app. There are a few mobile banking apps available such as SBI Anywhere Personal, SBI YONO, BHIM SBI Pay, and SBI Buddy.
| Owner | Government of India |
| Chairperson | Dinesh Kumar Khara |
| Headquarters | Mumbai |
| Customer service | 1800 425 3800 |
| Founded | 1 July 1955 |
| Apps Available | SBI Anywhere Personal, SBI YONO, SBI YONO Lite, BHIM SBI Pay, and SBI Buddy |
Here is how you can register and use the services available on the YONO/YONO Lite app.
How do I register for SBI mobile banking services?
Method 1: Via SMS
Step 1: SMS 'MBSREG' to 9223440000/9223567676.
Step 2: You will receive your user ID and MPIN.
Method 2: Via SBI ATM
Step 1: Visit the nearest SBI ATM.
Step 2: Select the 'Mobile Registration' option on the screen.
Step 3: Enter your registered mobile number.
Step 4: Upon confirmation, an SMS will be sent to you.
Step 5: You can, then, use the SBI mobile banking services.
Method 3: At the Branch
Step 1: Visit your SBI home branch.
Step 2: Fill up the registration form for mobile banking services.
Step 3: Submit the form at the branch office to get approval to avail of mobile banking services.
Method 4: Via Mobile App
Step 1: Open the Google Play Store or App Store on your mobile phone.
Step 2: Search for the 'YONO SBI' app or 'YONO Lite SBI' and download it.
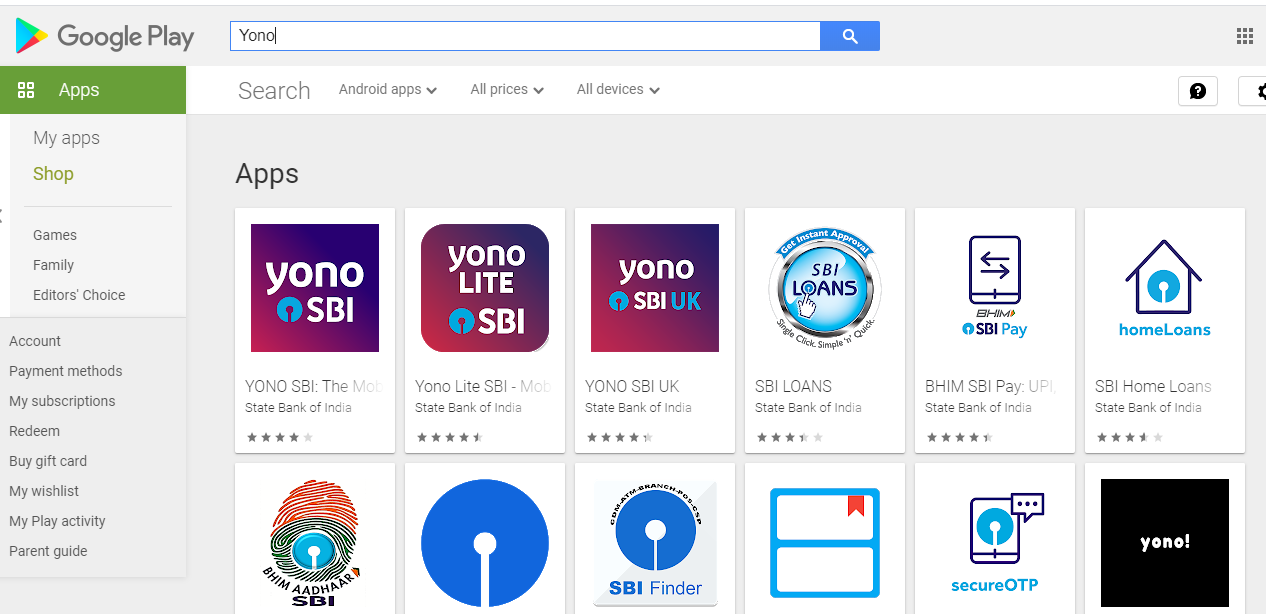
Step 3: Upon successful download, open the app.
Step 4: You will see a login screen.
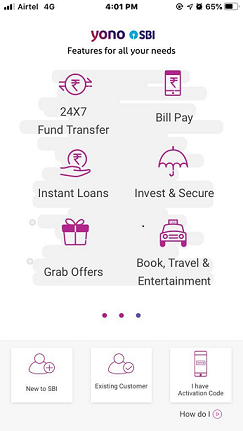
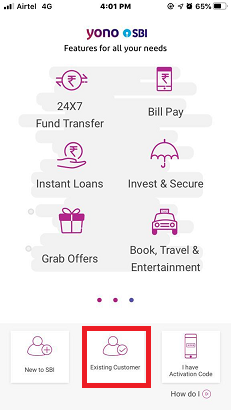
Step 5: Click on the 'Existing Customer' option at the bottom of the screen.
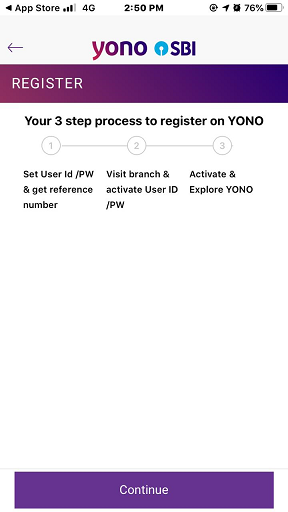
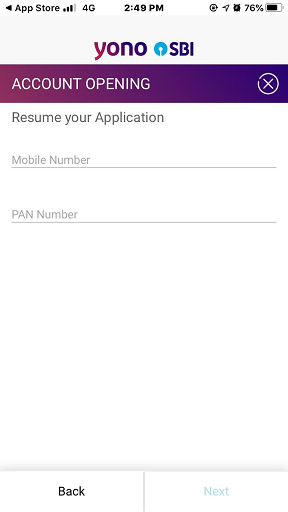
Step 6: You will see three steps to complete the registration process as in the image below. Click on the 'Continue' button.
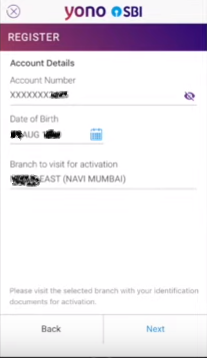
Step 7: In the 'Account Details' screen, enter the account number and date of birth.
Step 8: Your home branch name will be displayed, by default, as the branch to visit for activation. You can choose a different branch at your convenience. Click on the 'Next' button to go to the next step.
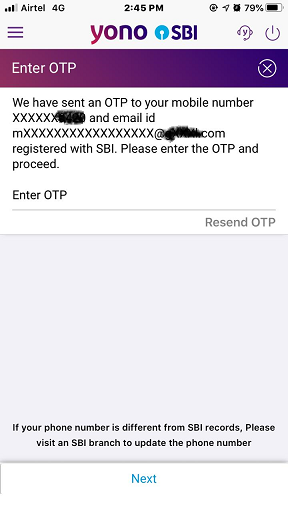
Step 9: An OTP will be sent to your registered mobile number. Enter the 6-digit OTP on the screen.
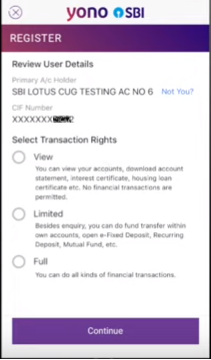
Step 10: Review the brief customer details displayed on the screen. Select the Transaction Rights based on what kind of transactions you would like to do on the app and click on the 'Continue' button.
Step 11: Enter the desired username and check its availability. If the username keyed-in is available, enter the temporary password of your choice twice and click the 'Confirm' button.
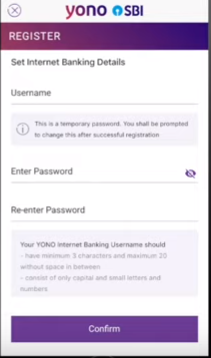
Step 12: A reference number will be displayed on the screen.
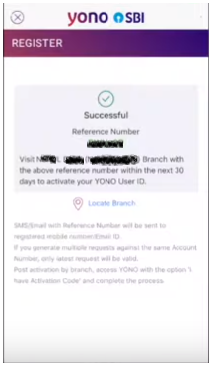
Step 13: Visit the branch you have selected in Step 8 within seven days for the activation of your username.
Step 14: Once the username is approved by the branch, you will receive an activation code on your registered mobile number and email address.
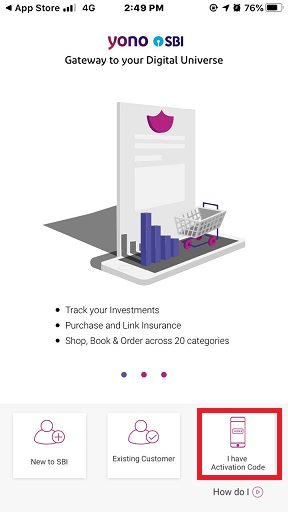
Step 15: Open the app and click on the 'I have Activation Code' option.
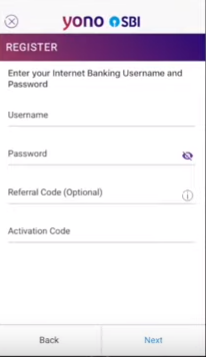
Step 16: Enter your username, password, referral code (optional), and the activation code received. Click on the 'Next' button.
Step 17: A success message will be displayed as shown in the image below to state the completion of the registration process.
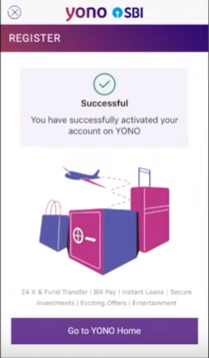
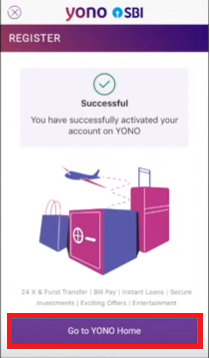
Step 18: Click on the 'Go to YONO Home' button.
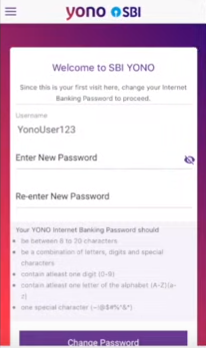
Step 19: On your first login, you will be prompted to change the password. Enter a new password twice and click on the 'Change Password'.
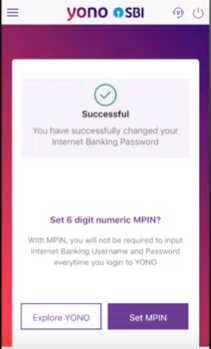
Step 20: Upon changing the password, you will be asked to set a 6-digit MPIN. Click on the 'Set MPIN' button.
Step 21: On the 'Consent' screen, select the checkbox with the label 'I acknowledge and accept the Terms and Conditions of using MPIN' and click on 'Next'.
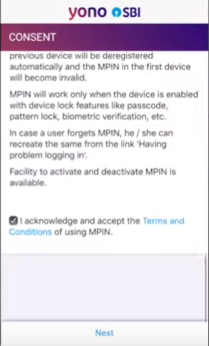
Step 22: Set a 6-digit permanent MPIN on the following screen:
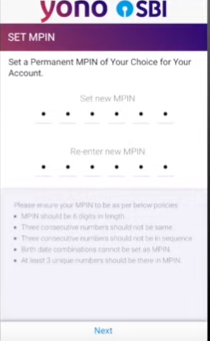
Step 23: An OTP will be sent to you on your registered mobile number. Enter the received OTP on the screen and click the 'Next' button.
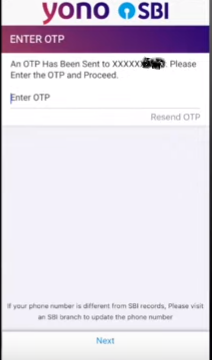
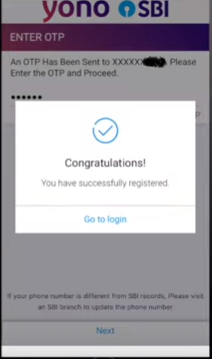
Step 24: A success message will be displayed to state the completion of the registration process.
How do I log in to SBI mobile banking services?
Step 1: Open the YONO or YONO Lite app on your smartphone.
Step 2: You can log in to your account using the 6-digit MPIN you have set up during the registration process.
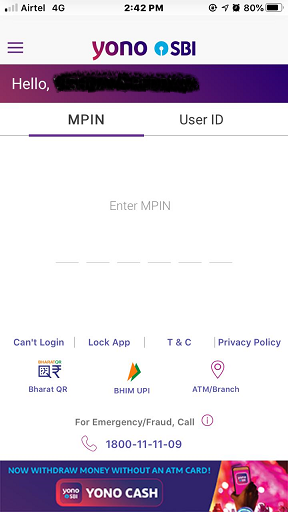
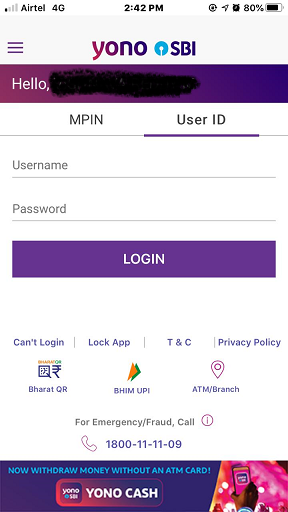
Step 3: Alternatively, you can enter your username and password in the relevant fields under the 'User ID' tab and click on the 'Login' button.
Step 4: You will be redirected to the dashboard where you can find all the services you can avail of through the app.
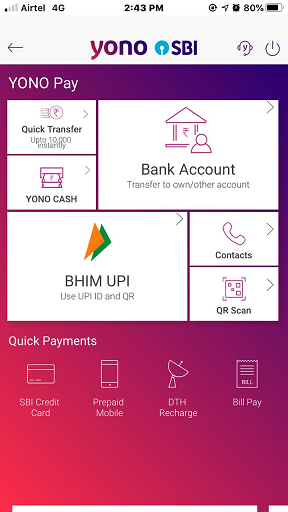
Services available on the mobile banking app
- Access your account statement and account summary online.
- Subscribe for e-statements every month.
- Check details of all your SBI accounts on a single platform.
- Open fixed deposit accounts.
- Transfer funds online to recipients within and outside the bank.
- Schedule transactions.
- Recharge your mobile number, DTH, state bank wallet, and pay utility bills online.
- Request for cheque book.
- Submit Form 15G/15H.
- Set standing instructions.
- Register for LPG subsidy.
How to transfer funds on YONO app?
Step 1: Log into your account on YONO or YONO Lite app.
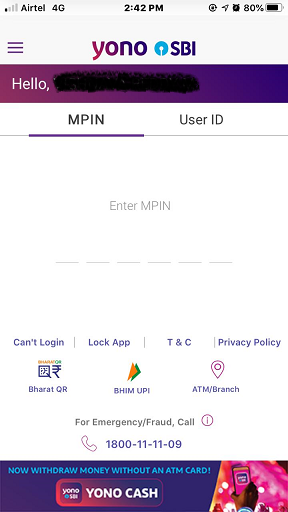
Step 2: Click on 'YONO Pay' on the dashboard to start with the fund's transfer process.
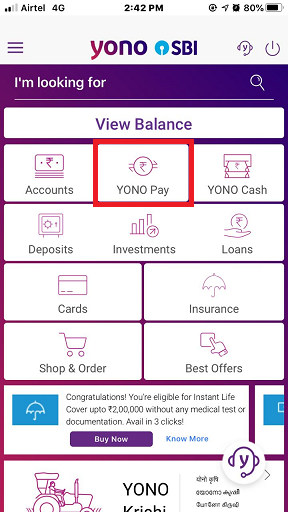
Step 3: Select the 'Bank Account' option to transfer funds to self or other accounts.
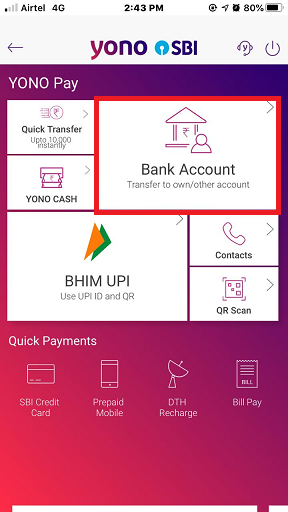
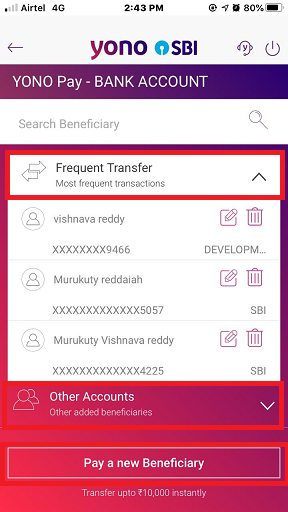
Step 4: Choose the beneficiary from the available options on either the 'Frequent Transfer' tab or the 'Other Accounts' tab. On the other hand, if you wish to transfer funds to a new beneficiary by clicking the 'Pay a New Beneficiary' button.
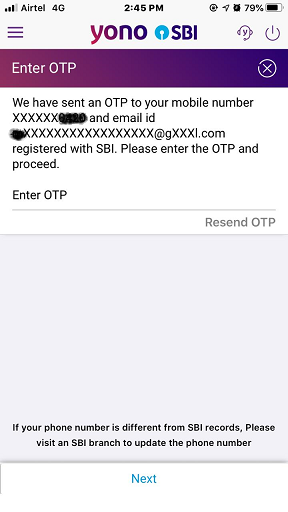
Step 5: An OTP will be sent to your registered mobile number. Enter the OTP to confirm that you are the authorised user.
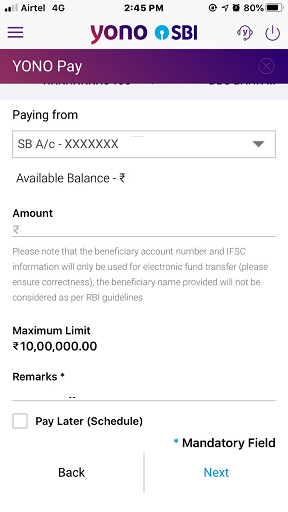
Step 6: Select the SBI account from which you would like to transfer the funds. Upon selecting, the available balance in the account will be shown. Key in the amount to be transferred and remarks. You can choose to pay later by selecting the checkbox. Click 'Next'.
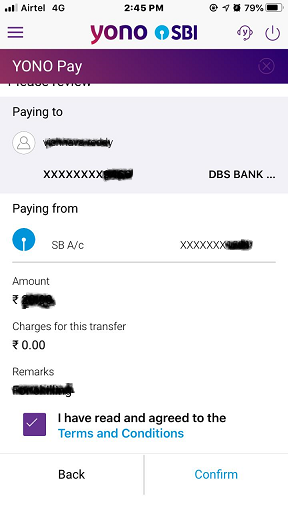
Step 7: Review the details such as the beneficiary account number, the SBI account from which the funds will be transferred, the amount to be transferred, charges applicable for the transfer if any, and remarks. Check the box representing that you agree to the terms and conditions and click on the 'Confirm' button.
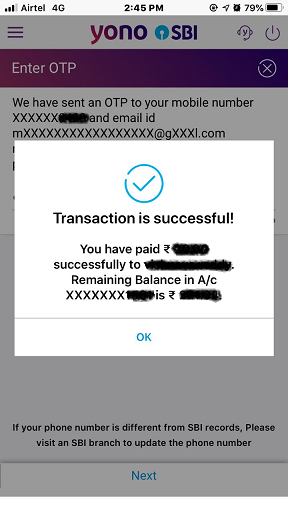
Step 8: A success message will be displayed confirming the fund transfer initiation.
Frequently Asked Questions
Can I send the SMS for registration from any mobile number?
No. You have to send the SMS for mobile banking registration only through the mobile number you have registered with the account. No other mobile number will be accepted.
What does YONO mean?
YONO stands for You Only Need One. It is an initiative taken by SBI to cover all its joint ventures under one umbrella through digital technology via the mobile app as well as the website. Customers can access all products and services of the bank, such as bank accounts, cards, mutual funds, life insurance, general insurance and securities through this app and website.
Related Articles
Citibank Mobile Banking
ICICI Bank Mobile Banking
Axis Bank Mobile Banking
HSBC Mobile Banking
HDFC Mobile Banking

Invest in Direct Mutual Funds
Save taxes upto Rs 46,800, 0% commission
How to Add Beneficiary Account in Yono Sbi
Source: https://cleartax.in/s/sbi-mobile-banking